The very notion of speedrunning sends shivers down the spine of the average player. The relentless ticking of a clock, the unforgiving demand for perfection—it's a realm reserved for the elite, the gods of gaming reflexes. Yet, in the year 2026, the mesmerizing world of Hollow Knight: Silksong possesses a strange, almost magical allure. Its intricate beauty and satisfying combat weave a spell so potent that it can compel even the most hesitant, non-speedrunning soul to reach for that seemingly impossible achievement: completing the entire, sprawling adventure in under five hours. Imagine the audacity! A first playthrough, a glorious, exploration-filled 30-hour odyssey, must now be condensed, compressed, and conquered in a mere fraction of the time. The task appears Herculean, a mountain too steep to climb. But here lies the glorious secret, whispered among the silken threads of Pharloom: this five-hour barrier is not a wall, but a gate. And with the right key—a safe, strategic route and a calm mind—any player can swing it wide open and claim their victory.

🎯 Foundational Philosophy: The Calm Within the Storm
Before a single bell is rung, internalize this critical mantra: speed does not equal panic. Rushing headlong into every room, mashing buttons in a frantic blur, is the surest path to failure, to death, and to wasted minutes. This guide champions a philosophy of controlled, intelligent haste. It is designed for survival and consistency, not for setting world records. A record-breaking speedrunner would strip away every non-essential item, dancing on the razor's edge of disaster. For us, a more forgiving path is chosen. Grabbing an extra Mask Shard or a useful relic might add a few seconds to the clock, but it provides a cushion of safety that is utterly invaluable. Remember, this is a race against the clock, not a Steel Soul Run. Death is a teacher, not a game-ender. The author themselves achieved a stellar time of 3 hours and 28 minutes while dying "quite a few times." Each death is a lesson; take a breath, learn, and proceed. The in-game timer mercifully pauses when you do, so use that pause button to consult this guide and plan your next move without pressure.
🗺️ The Golden Route: A Step-by-Step Pilgrimage
This path is a carefully curated pilgrimage through Pharloom, prioritizing safety and power progression to make the daunting endgame manageable.
Act I: Moss Grotto to the Third Bell
The journey begins in the familiar Moss Grotto. Speed-tech like down-slashing is unnecessary here; simply proceed through the tutorial and defeat the Moss Mother. Emerge into Bone Bottom and, crucially, ignore the town. Your destination is The Marrow. Follow the path upwards, but instead of attempting a tricky enemy-lure skip, take the safer route: head down and break through the marked wall on the right.
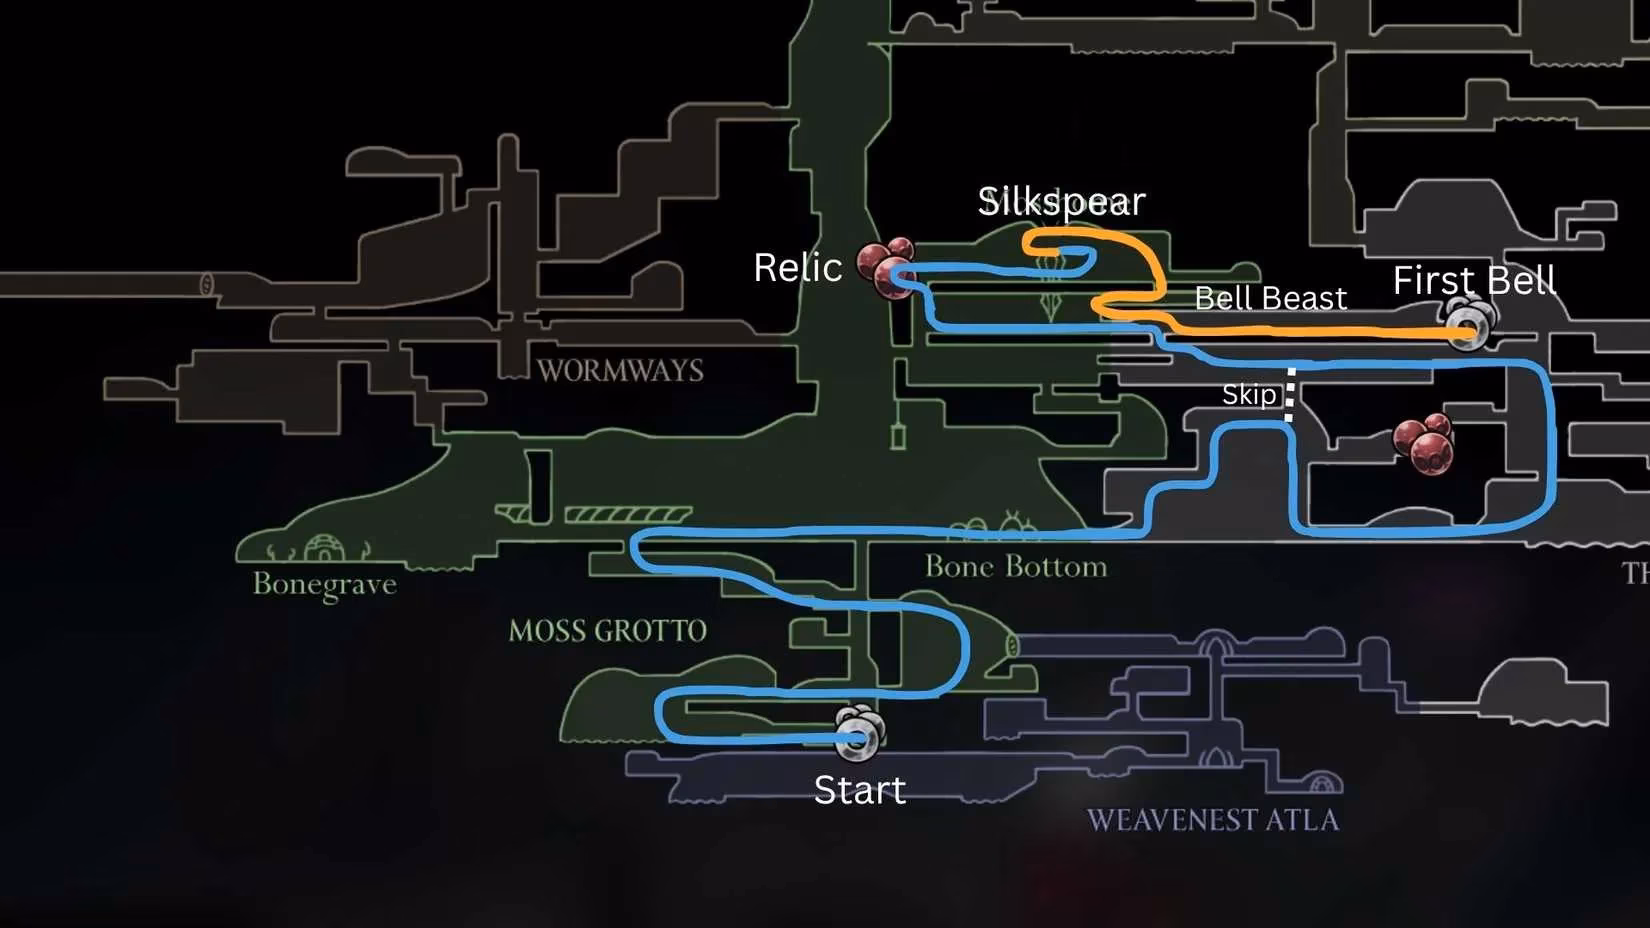
Navigate to Shakra, then head west through Moss Home. In the northwest corner, smash another breakable wall to secure a Choral Commandment—a relic worth 180 precious rosaries later. Claim the Silkspear, a weapon whose power cannot be overstated (it hits with the force of roughly 3 normal slashes!), and follow the orange path on your map to vanquish the first Bell Beast. Ring that first bell with pride!
The journey eastward continues into the Deep Docks and Hunter's March. Use the Silkspear liberally in the arena fight here—its wide arc is perfect for crowd control. Claim the dash ability, face the simple Lace fight, and ring the Second Bell. The Far Fields and Greymoor await. A key detour involves visiting the Seamstress in the Far Fields to start the Flexile Spines Wish. Farm spines from a nearby spiky enemy, quit and reload to warp back to her, complete the wish, and then defeat the Fourth Chorus (or attempt a difficult healing-tech skip if feeling bold). Use updrafts to ascend into Greymoor, conquer the arena atop Craw Lake, and release the balloons to access and ring the Third Bell.
Act II: Bellhart and the Ascent to Power
Westward again, past a hole in the floor, lies a secret aquatic room containing a Bone Scroll relic (90 rosaries!). Traverse the Halfway Home, handle a small arena, and descend towards Moorwing. This foe has been significantly nerfed since the game's original release, so crush it and arrive in the grand city of Bellhart.
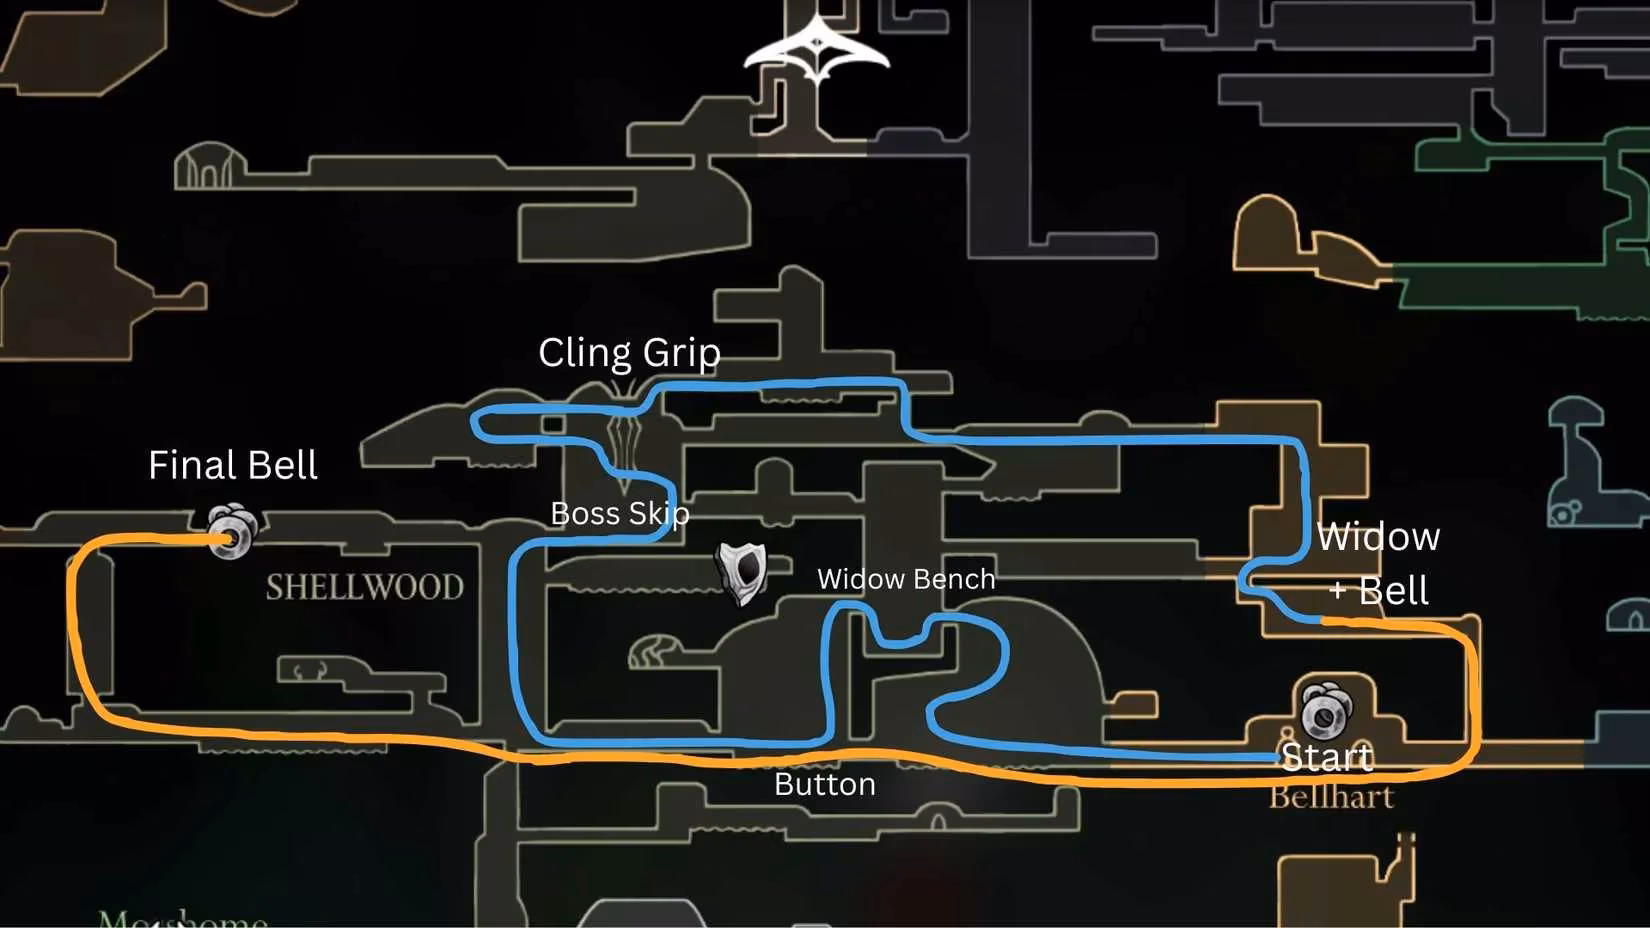
Here, the path turns north into Shellwood. Race upwards, using the Silkspear to decimate groups in a small arena. Connect rooms, navigate a pogo section, and perform a Taunt Skip to bypass the Sister Splinter fight entirely—a trick invaluable for Steel Soul. Grab the Cling Grip and ascend to upper Bellhart. Before facing the formidable Widow, unlock her nearby bench; the run-back is short, but this preparation saves sanity. Upon victory, ring the Fourth Bell, return to Bellhart to upgrade your Needle and trade relics for rosaries, and unlock the Bell Beast station. These upgrades are non-negotiable. Then, follow the orange line west and up to discover and ring the Fifth and final bell.
⚡ Optional: The Path of the Titan (Highly Recommended)
This segment is optional but transforms Hornet from a swift survivor into a true powerhouse. If you've collected Mask Shards, it's time to cash in.
-
Unlock the Bell Beast station east of the fifth bell.
-
Descend a massive vertical shaft to the Wormways, break a hidden wall for a Mask Shard.
-
Plummet all the way down to Moss Grotto, access Weavenest Atla, and find Eva. She will evolve your Hunter's Crest, granting a devastating 20% power boost when charged.
-
Return to a lava chamber, pogo off enemies to claim a final Mask Shard.
The result? A mighty Hornet with six Masks and a supercharged basic attack. This investment pays massive dividends in the brutal challenges to come.

Act III: The Gauntlet and The Grand Finale
Re-enter Shellwood and head west into the Blasted Steps. Climb to the Last Judge. With your evolved Crest, this rematch is far smoother. Keep distance, build stacks, and watch its health melt. Proceed through the Grand Gate, snag another Bone Scroll in the Underworks, and ascend into the haunting Choral Chambers.
The Chambers are a labyrinth. Meet Lace to trigger enemy spawns, then ignore everything as you sprint upwards and east to Songclave. The Dancer's boss fight, terrifying in a normal playthrough, becomes trivial with your powered-up Crest. Now, descend through the Cogwork Core (use your Clawline expertly on the gears) and into the Whispering Vaults. Complete an arena, unlock a crucial shortcut from below, and collect Pale Oil. This loops you back to challenge Trobbio. Defeat him, then immediately return to Bellhart to upgrade your Needle one final time. This is critical.
The final ascent is a test of endurance. Platform through the Cogwork Core's rotating puzzles to learn the Second Song. Glide down, navigate back to the High Halls, and prepare for the run's true climax: the High Halls Arena. This multi-wave gauntlet is the hardest part. With only 5-6 health, every move counts. The strategy? Don't panic. Use the Silkspear's multi-hit capability, employ Trobbio's Claw Mirror for healing, and for the minibosses at the end, bait them to one side. You can afford to spend an hour here if needed. Victory grants the Third Song.
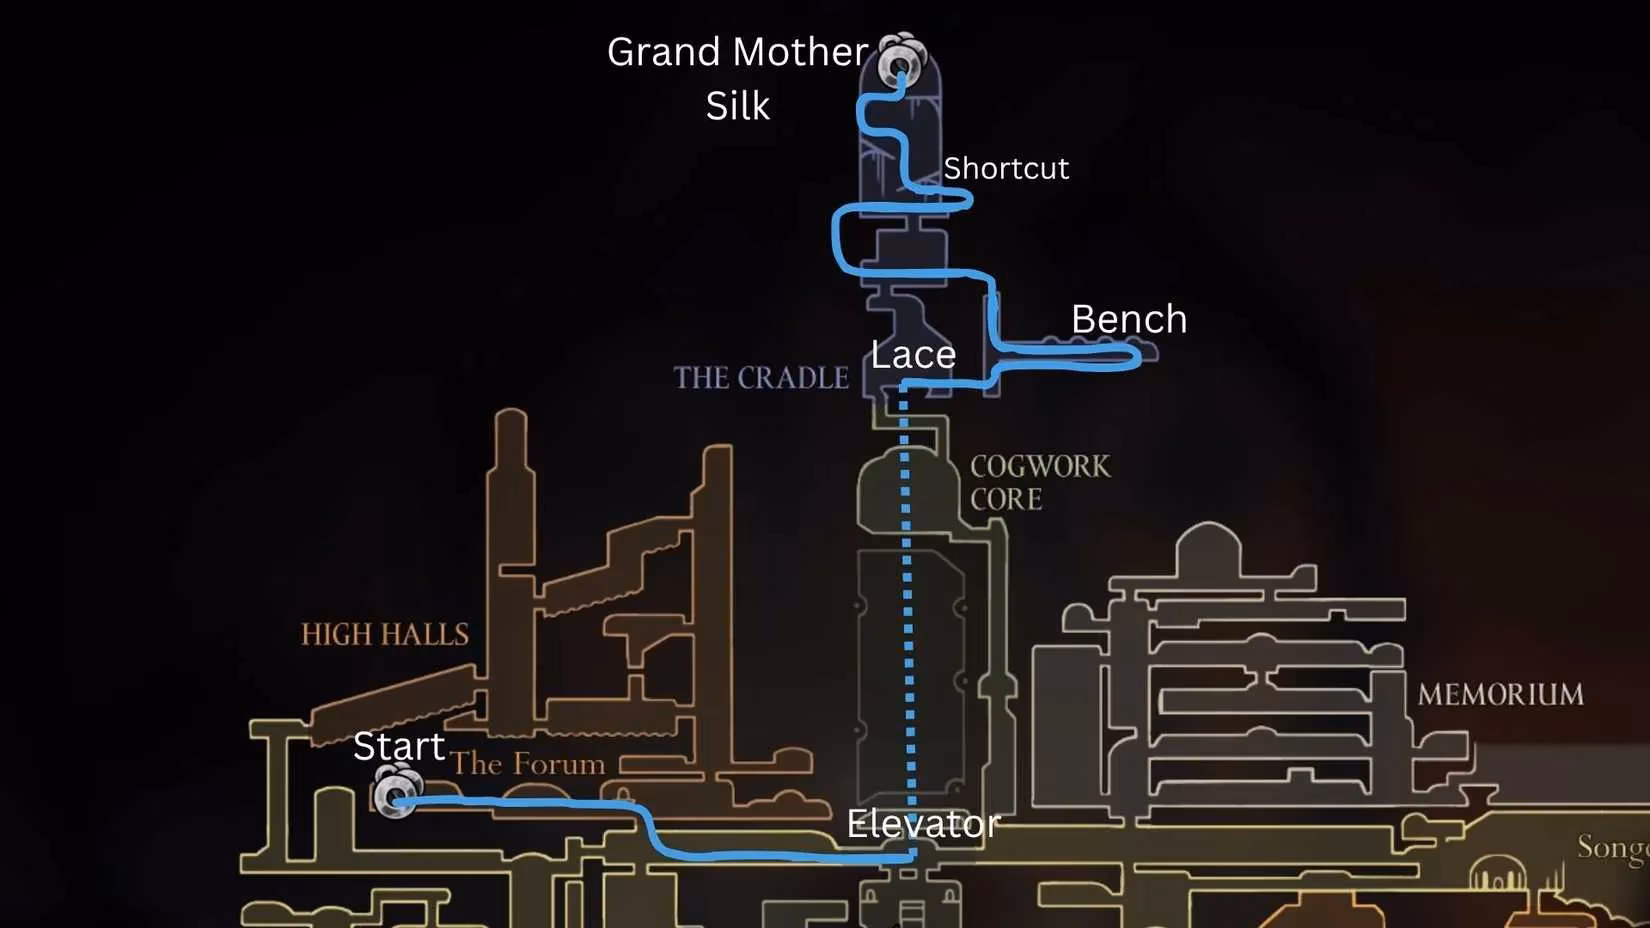
Return to the Dancer's chamber, play the song to open the elevator, and face Lace one last time in the Cradle. Her agility makes this duel perilous. But once she falls, the path is clear. Make the final climb to Grand Mother Silk. And here is the beautiful, almost poetic conclusion: after the Arena and Lace, this ultimate battle feels like a complete walk in the park. A final, cathartic release of all the skill and power you've accumulated.
🏆 The Triumphant Conclusion
CONGRATULATIONS! You have done it. You have conquered Pharloom in under five hours. The achievement is yours, a testament not to inhuman reflexes, but to smart planning, learned patience, and the courage to try. The clock, once a tyrant, is now a trophy. Give yourself that well-deserved pat on the back. Bask in the glory. And then, perhaps, a sly, confident thought might whisper from the depths of the kingdom... Now, it's time for Steel Soul. Are you ready? 😉
Leave a Comment
Comments